![]()
Making Tray Mats With Non-rectangular Bases
Get spreasheet(.xlsx)
While making Making Cove Mats, I wondered what would change if the base wasn't a rectangle. Well, it gets one step more complicated. In this article I give tips how to make those mats even without a Computerized Mat Cutter (CMC). And if you're curious, I'll even give you links to the derivation of the formulas you'll be using.
How To Make It
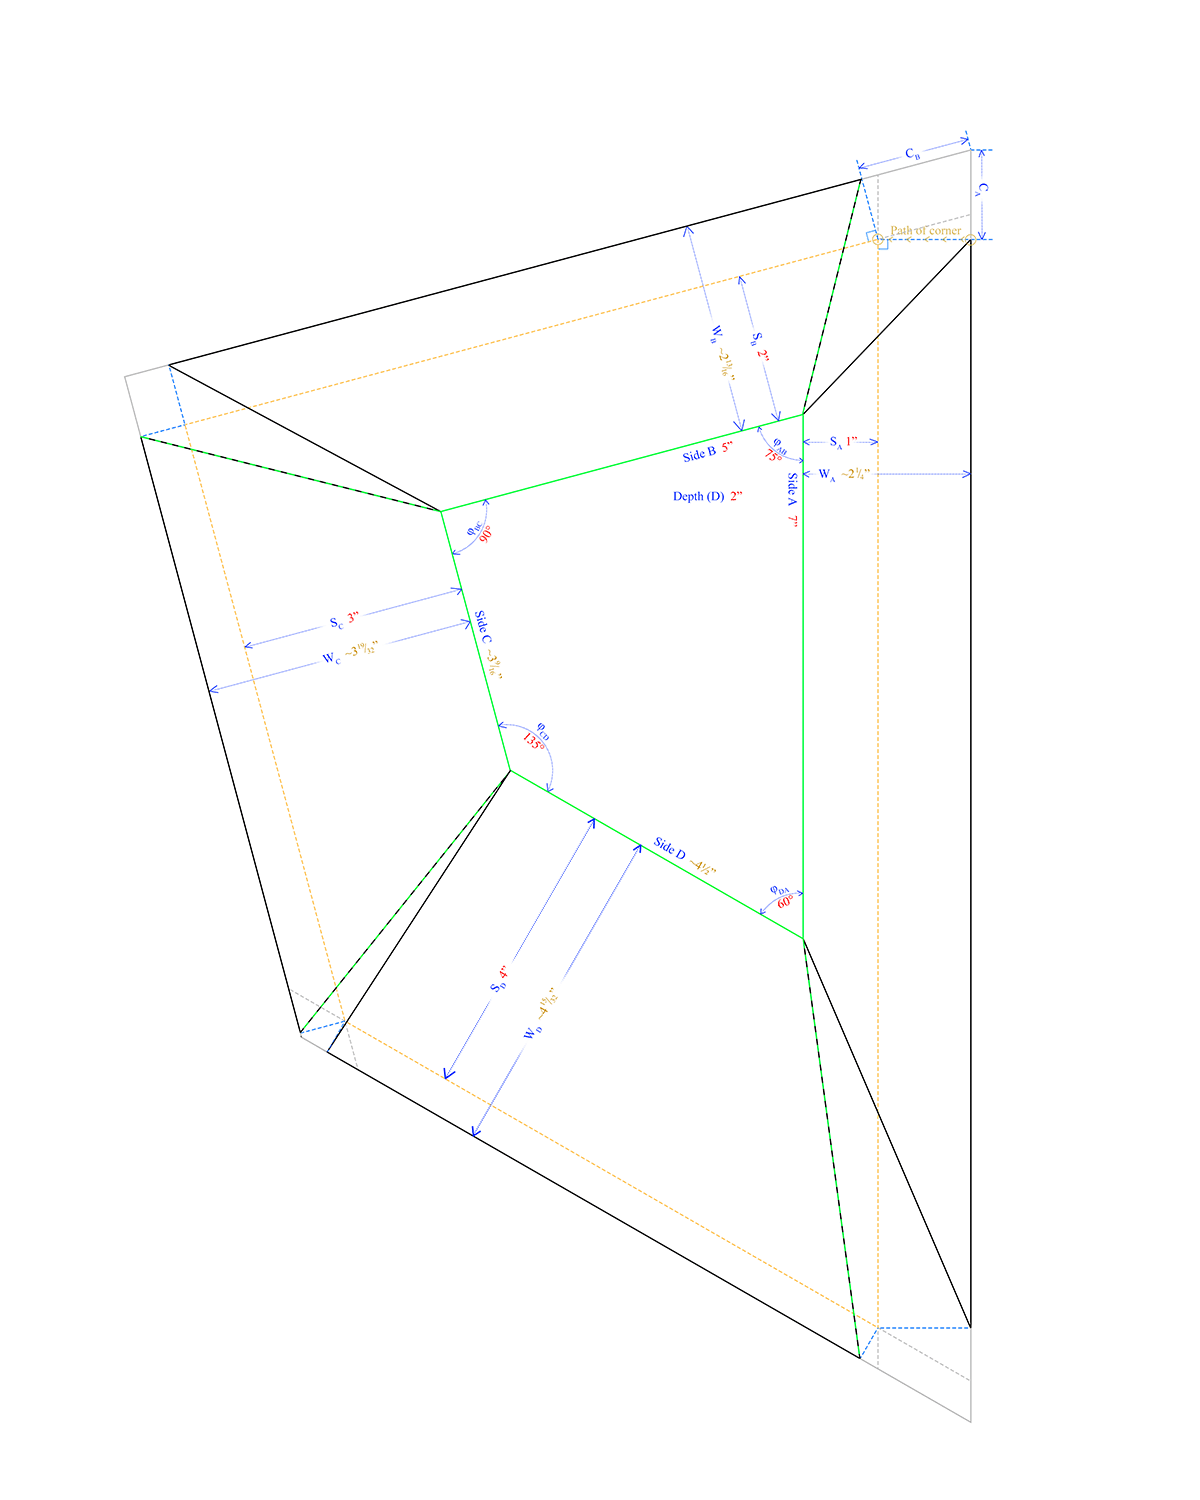
To use these instructions, all you need is the depth of the box, as shown in Figure 1, what I've called 'the spread', or how much wider the box needs to be at the top than at the base along that edge (also in Figure 1), and the angles of each corner of the base (in Figure 2). You can have different spreads along each of your edges, and different angles (even angles greater than 180 degrees) in each corner of the base. You are not even restricted to polygons with four sides. The red numbers are the defined parameters for the examples we will be using in this article. The orange numbers were derived from the red numbers. Both the Depth and the Spreads are inside measurements. To get outside measurements for whatever reason, just add the mat thickness to the depth and twice that much for each of the two side dimensions.
Warning: Optional steps may use trigonometry. Fortunately, even the calculator in Windows 11 has trigonometric functions now, or you can get a free phone app with that feature. We explain these terms as we go.
So let's get started. Although most of the steps are similar to those in Making Cove Mats, even they have been rearranged.
- Draw the Base. There is more than one way to do this. The simplest is to draw everything out on the computer and then print it out. I used Photoshop for that only because that's what I have. There are plenty of other drawing or drafting programs that should work. Then, if you know someone with the right printer, you can print the plan directly on the matboard as described in What I Learned About Printing On Matboard or on a large enough piece of paper and then transfer it or glue it to the back of the matboard.
- Decide Depth (D) and Spreads (S).
- Calculate the Wall Widths (W). This involves the Pythagorean Theorem. (Or does it? See Analog Hypotenuse.) For example, the wall width on Side A of Figure 2,
- Draw Wall Edges. Mark the distance W? outward from each base edge and draw the edge line. Extend the line past the edge line of the adjacent wall edges.
- Cut Out Trap Mat. Cut out the whole shape defined by the Trap Wall Edges just drawn.
- Draw Spread Construction Lines. Measure and mark the appropriate spread (S?) out from the base along each edge (just as you did with the W's in Step 4) and draw the construction line for S. Extend the construction lines out to the edges of the walls just drawn. In our illustrations, the construction lines are the dashed lines. The yellow portion represents the final position of the upper edge of the cove/tray wall.
- Find Corner Distance (C). From the intersection of the adjacent Spread Construction Lines, draw construction lines to the outer edge of each wall that are perpendicular to that edge. In Figures 2 and 3, these are the blue dashed lines.
- Draw Corner Edge Cut Lines. From where the construction line in Step 6 meets the upper edge of the trap wall, start the cut line straight to the nearest corner of the base. Repeat along both edges of each corner.
- Cut Corner Edge Lines. Instead of cutting both edges all the way through, one could make a half-cut (the technical term for a cut that doesn't go all the way through the mat) on one of the cuts in each corner so the still-attached material could be used as a backing to be glued to the back of other wall 'flap' and then trimmed during assembly. You may want to make a practice cut on a scrap mat to be sure the cut doesn't go too deep (or too shallow). Just a thought. In Figure 2, these half-cut candidates are represented by black/green dashed lines.
- Make Half-cuts Along the Edges of Base. This is just to make folding easier and could be considered optional. These half-cuts are represented by the solid green lines in Figure 2.
- Fold and Assemble the Cove Mat. Use either glue or tape, to taste. And that's it; you're done. Congratulations!
The more traditional way requires familiarity with a protractor and a yardstick. Either way, remember, you will be measuring, marking, and cutting on the back side of the mat, as usual, so the image needs to be flipped. That means that the spreads in our example will appear to increase from 1" to 2", and so on, as you go around the edge clockwise instead of counter-clockwise. If all of your spreads and angles are the same, this isn't an issue.
To do it the hard way, measure and mark the appropriate side lengths and base corner angles (φ) on the back side of the mat. Use a straight edge or ruler to draw the edges. Leave plenty of room on the mat around the base for the walls and extensions. The base lines need not extend beyond the corners of the base.
Even doing it this way, it might be beneficial to draw it out on paper and then transfer or glue it to the matboard. It can be just thrown out if you make too many mistakes and you might be able to position it to use the least amount of matboard. We have a three-foot wide roll of kraft paper that we normally use for covering the back of our framed work that could be used for this. Just another thought.
≈ 2.236 or 21/4.
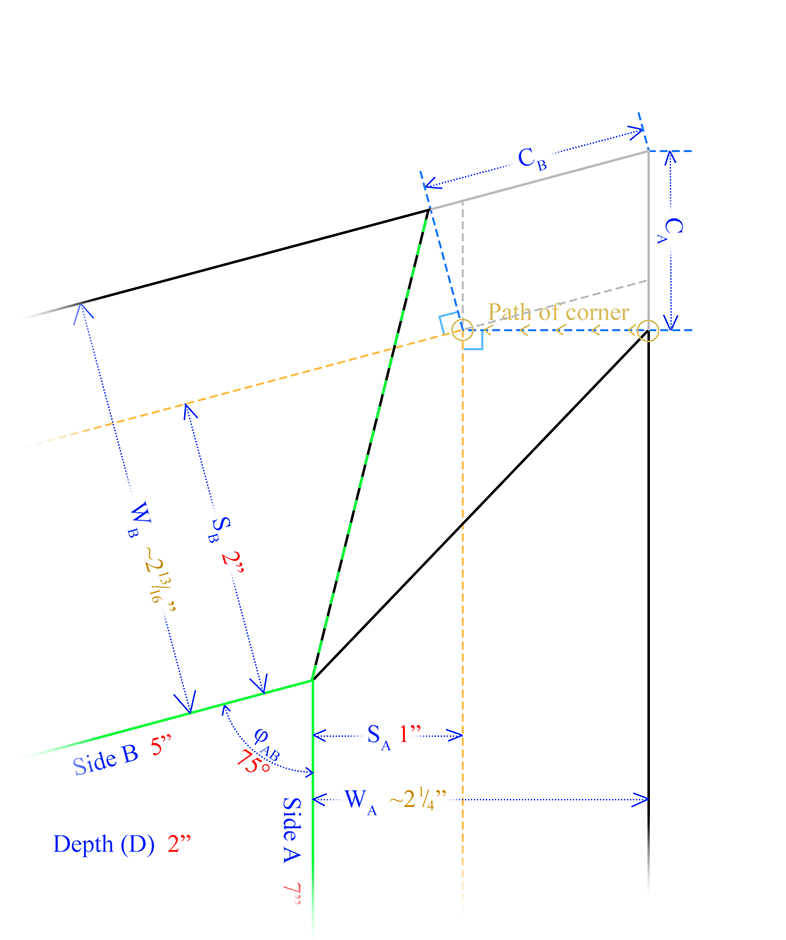
As it is folded into position, the side wall hinges on its edge of the base, and from above, its top edge corner appears to follow a path perpendicular to that 'hinge', as shown for the upper edge of Side A in Figure 3, until it reaches its final position at the intersection of the two adjacent spread construction lines. (Only for 90° base corners would that coincide with the extension of the spread construction line the adjacent wall.) Those spread construction lines represent the upper edge of the wall in its final position, and is shown in yellow in both figures.
If, for some reason, you need to calculate the distance from the corner without drawing construction lines, CA in Figure 3 would just be
Similarly,
Trigonometric functions are defined as the ratios between two sides of a right triangle (having a 90° angle). The sine of an angle θ is the length of the side opposite the angle divided by the hypotenuse. In Figure 1, sin(θ) = Spread (S) / Wall Width (W).
The tangent is the ratio between the opposite side and the adjacent side. In Figure 1,
tan(θ) = S / Depth (D).
Note: If all of your spreads are the same, this reduces to
When the base corner angle, φ, is a right angle, as in "Making Cove Mats", the sin(90°) = 1 and tan(90°) goes to infinity, making its term go to zero. That reduces the equation of the corner distance to
CA = WB - SB,
just like the equation in "Finding Corner Distance", the second paragraph of Step 6 in "Making Cove Mats" .
(If dividing by infinity (∞) troubles you, you can multiply the second term by the cotangent instead of dividing by the tangent. The cotangent is the reciprocal of the tangent, meaning it is the side of the right triangle adjacent to the angle in question divided by the opposite side. The cot(90°) = 0.)
Other Thoughts
Finding Theta (θ)
If you need to make support for your cove mat (as shown in this post in The Grumble), you would need to know the θ's, as pictorically defined in the Side View of Figure 1.
tan(θ?) = S?/D. Therefore, θL = tan-1(2/2) = 45°.
Note: For those unfamiliar with the notation, the "-1" superscript after "tan" (or "cos", etc.) means "inverse" (a.k.a. arctangent) or "angle whose tangent (or cosine, etc.) is . . .". Your new calculator has a button to bring those up.
Finding Alpha (α)
If you were cutting this cove out of a door skin, thin plywood, acrylic, or SintraAbout, you would also need to know these angles (shown in Figure 4 below).

It can be shown that
meaning
When all of your spreads are the same, this formula reduces to
Click here for details.And if φ = 90°, sin(φ) = 1, making S/sin(φ) = S, while tan(φ) goes to infinity, making S/tan(φ) go to 0. That would reduce this equation for tan(α) to be the same as that given in "Making Cove Mats".
If the material you use has any thickness, you will also need to know what angle to tilt your table saw (or miter saw, or radial arm saw) blade. That is also beyond the scope of this article.
Reflex Angles
A cove with a base that includes reflex angles (an angle over 180°), like a star, for example, can't be done on one contiguous sheet of matboard without gaps in the walls of those interior corners.
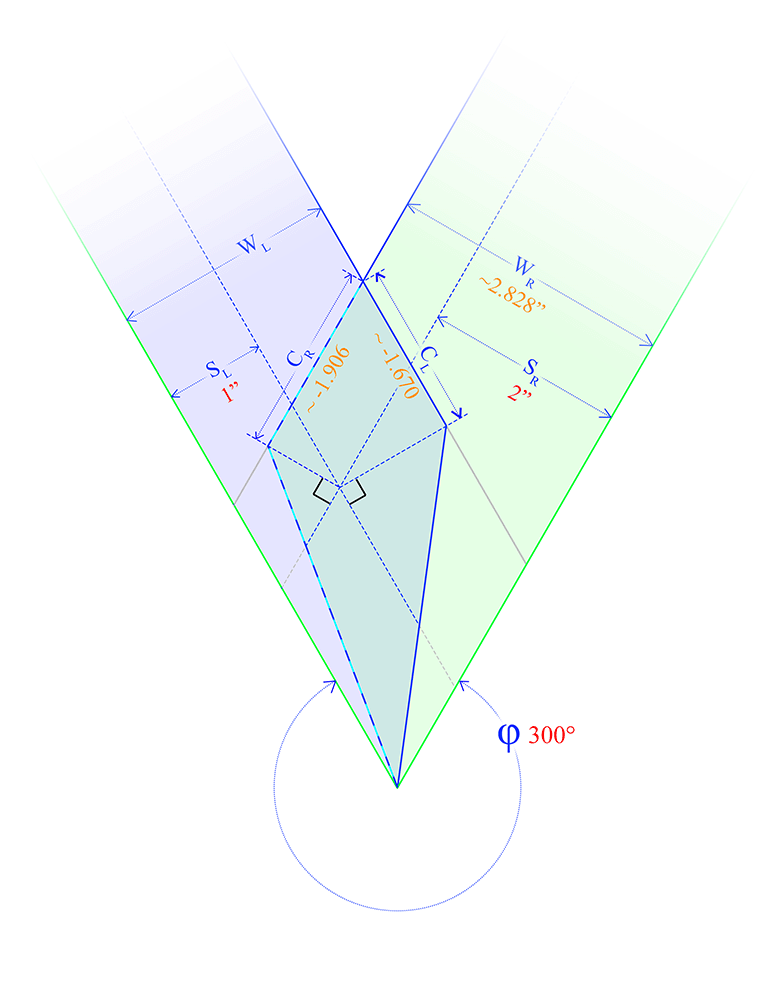
In Figure 5, one can see the overlap between the light blue wall of Side L and the light green wall of Side R (the darker blueish green kite-shaped region). One way to handle that is to cut the whole Wall R (including the overlapped part) from a separate piece of matboard. Then on this main matboard, cut along the entire outer edge of Wall L, including the overlapped section, on the main piece of matboard, leaving the remainder of Wall R to be cut sans overlapped corner piece. Do not cut along the blue/cyan dashed line. The remainder of the right wall can be the backing for the Wall R cut on the separate piece.
If you need to calculate the corner distances (C), the formula will be the same, but the answers will be negative. That just means they should be applied as shown in Figure 5.
If you need to find the α's, that formula is also the same.
Conclusion
We've shown that even with a more complicated tray mat, the use of trigonometry may be optional.
You can contact us if you have any questions, or hit the Comment Button below if you have any suggestions for improvement.