We have a Trimline Canopy by Flourishabout, with lower StaBars and a small (30″) front awning. Although we’ve also heard good things about the Light-Dome canopywebsite, I don’t know how many of the following tips would apply to other manufacturers. Not all of these concepts are brand-specific, however.
This will not replace the setup instructions provided by the manufacturer. I refer to the latest information on the Flourish website as appropriate. (I’ve noticed they have made a few changes since we bought our canopy in 2010). I suggest you read your instructionsFlourish and even watch their video before starting. (For ours it would be TrimLine Canopy Detailed Setup Video With Chris).
Storing Gear
We don’t completely disassemble our poles after each show. Since we carry all tent gear and art in our van, we follow something very similar to the “Fastest set up” on Page 9 of the “Trimline Canopy 10′ x 10′ Instructions for Assembly” (373.pdf). Specifically:
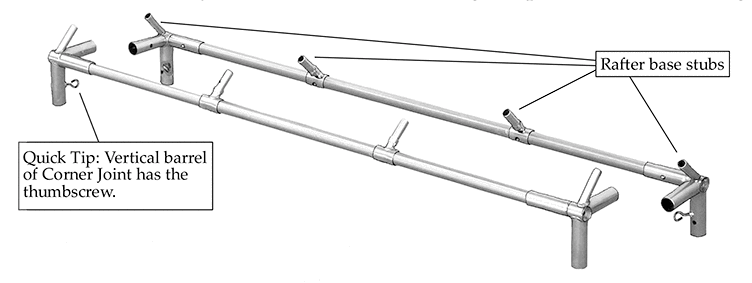
- The rafter base poles have rafter base joints and corner joints attached, as shown in Figure 1 above.
- The Ridge Pole has Ridge Support Joints on both ends. The Riser Poles get stored with the Rafters.
- The Awning Ells are attached to the long awning pole (described as the no-color 116½” pole in the “Trimline Awning Assembly Instructions” (394.pdf). The short poles for the side of the awning are stowed with the Rafters.
- The legs are stowed in the “Rest-Stop position” with the top half against the Rest Stop Button. The StaBar Ell or 3-way is attached, as is the foot and the LD (a.k.a. Awning Support) Ell (as appropriate). All of these attachments are locked in their base positions.
We store the tent walls and other small parts in a large tote box (outside dimensions 32″L x 20″W x 18″H).
Setup/Assembly
We set up our canopy with the heat/wind vents on the sides instead of the front and back. That way I don’t have to reach over the awning to open the vent. The downside is that if the tents are too close together, I’ll have to open the vents from inside the booth.
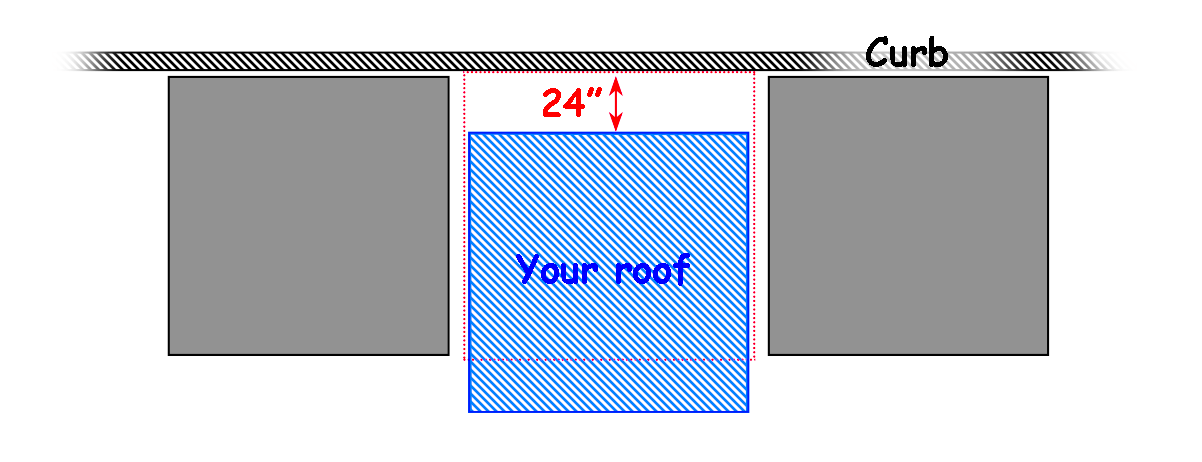
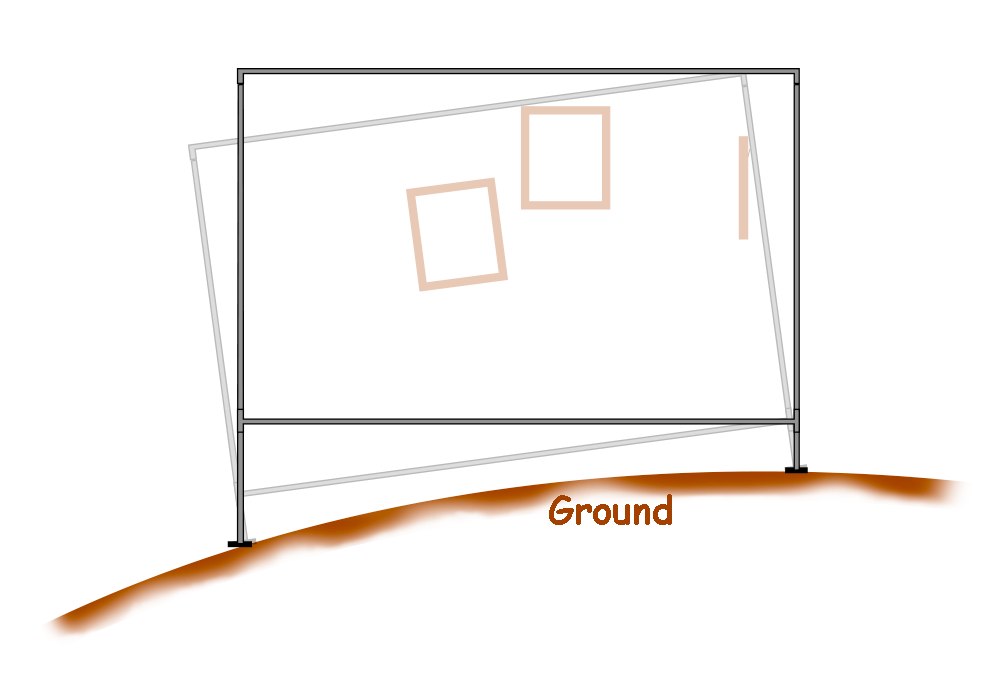
When placing the roof in position, place the wall that will have its legs attached to go up first exactly 24″ inside (toward the center of the booth from) its final position.
This is assuming a ten-foot tent with legs in the Rest Stop position (roughly 79″ long). It is based on the Pythagorean Theorem (Notice that in Figure 3 below, the roof poles, legs, and ground form a right triangle with the ground being the hypotenuse since the legs connect to the roof poles at a 90° angle. The general formula (in case you have longer roof poles and/or longer legs) would then be
\( Offset = \sqrt{ (PoleLength^2 + LegLength^2) } – PoleLength \)
Its two adjoining walls should align with their final position. Which side of the roof goes up first may be dictated by the placement of neighboring tents and other obstacles. For example, if you are in a line of booths that are being set up with their back wall against the curb and both of your neighbors have already set up, you should place your back wall two feet from the curb. In other words, the front wall will be 24″ further out in the street. The sides will be in their correct plane (see Figure 2). As you tilt the top up and attach your back legs, their foot will land against the curb. (See Figure 3).

When attaching the roof to the frame, we connect the straps and buckles on the vent sides and the wide Velcro on the rafter sides. But we don’t connect the thinner corner Velcro straps at that time. If we did, they would get in the way of hanging our weights.
Leveling The Tent
Roof Poles
We don’t see many other artists do this, but we use a small level to make sure our walls. Subsequently our panels, are vertical (and our roof poles and StaBars are horizontal). As shown in Figure 4, having your framed pieces against the wall and straight is important. With all four legs in their lowest (“Rest Stop”) position, find which corner is highest by placing the level along your roof poles on all four sides and “follow the bubble.” Since the poles sag over time due to the weight hanging from them, you should take measurements at more than one location along each pole. The leg in the highest corner will remain in its lowest position. Lengthen the adjoining legs as appropriate. Since one can only raise a leg in 1¾” increments, the ‘true’ adjustment may fall between two holes. Just pick one.
StaBars
Since the lower bars are only held by thumb screws, positioning is continuous (no 1¾” increments). So we could do an even better job of leveling them than we do with the top bars. But because of the way our panels hang from the horizontal bars (see www.beehappygraphics.com/articles/panels.html), it is more important to get the lower bars parallel to the top bars than it is to get them level. After measuring the change in length of the leg (which should be in agreement with the formula
\( HeightDifference = AdjustmentHoles \times 1.75″ \) ,
move the StaBar joint up accordingly.
After measuring each leg for each festival for about nine years, I came up with a shortcut.
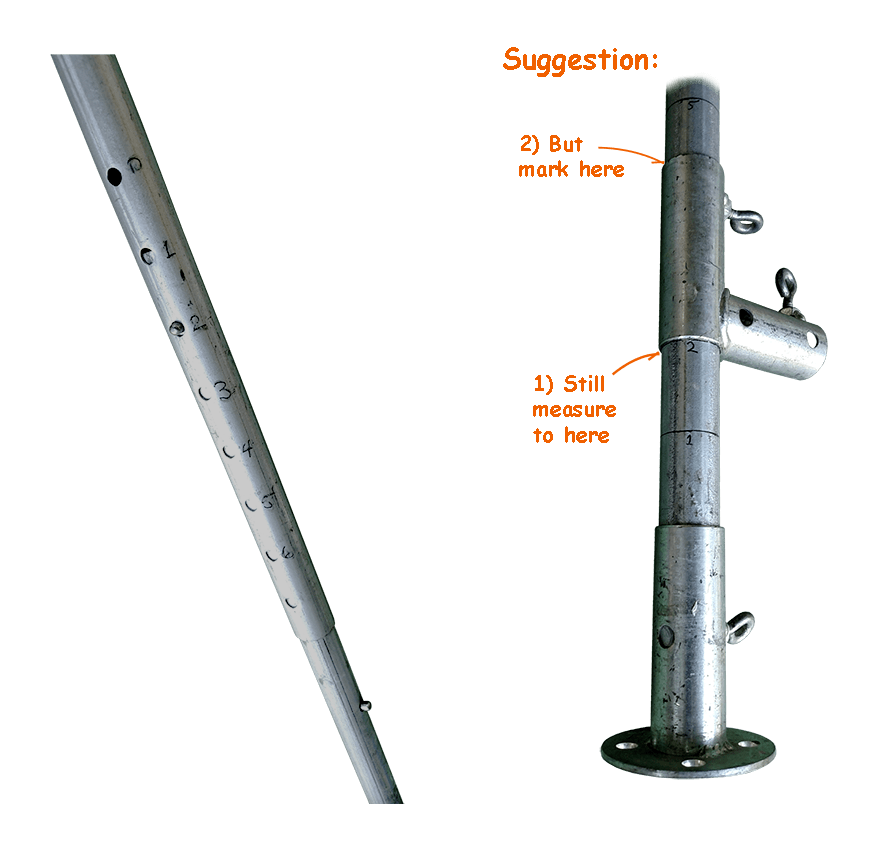
Notice in Figure 5 that I labeled the holes in the top section of the leg and pre-measured, marked, and labeled the correct adjustment distances on the bottom of the leg. That has already saved me much more time than I invested in making these improvements. The figure also mentions my suggestion for Version 2. Although the important measurement is the distance from the bottom edge of the StaBar Joint to the top of the foot, it would be better to have the markings and labels on the top edge of the StaBar Joint. Then you can read them without having to bend over so far to look under the joint.
Weights
Trimline canopies come with Ground Screws and 10″ Steel Spikes for anchoring the canopy to the ground. These are almost never allowed at the art festivals in Florida that we attend. We can use weights anywhere.
Flourish has their GreatWeightsabout. These heavy-duty vinyl bags will allegedly hold up to 40 pounds of sand or pea rock. They cost extra. We built our own from parts readily available at any hardware store:
- a 30″ section of 4″ PVC pipe
- a flat endcap
- a bag of cement
- and an eyebolt with nuts and washers.
Each of our weights is 34 pounds. Some festivals want more, but our panels and art hanging from the roof make up the difference. Construction details for the weights will have to wait for another day. (In the meantime, email me or comment below if you need details).
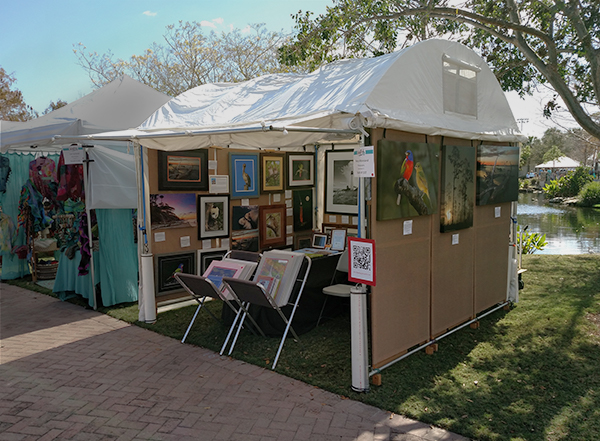
We hang the weights from the canopy with tie-down straps. Then we strap them to the leg with a bungee cord at the top and bottom. It is imperative not just to have them dangling but also to hold them firmly in place, so they don’t turn into wrecking balls in heavier winds. If you look closely, you can see our weights in action in the picture at the top of this article.
Our Skirt
Typically, the bottom of our walls is less than three inches from the ground. So we were amazed to see how far up from the ground our panels (and art) got wet after a rain. To solve this, Nancy got some clear plastic sheeting to wrap around the bottom of the tent before the walls go up. The plastic should come at least 24″ up from the ground, plus a couple of inches extra on the ground. Ours is at least four mils thick. We need about 42 feet to go around all four walls.
We use the clear 2″ shipping tape to attach it to each leg. (That works much better if you get the skirt up before it starts raining). Start with one of the front legs, and then go past the back legs to the other front leg. There should still be about eleven feet of plastic to go across the front. But while the tent is open, we roll up the extra and stow it behind the nearest weight. When we close up, we pull out that last bit of skirt, stretch it across the front, and tape it to the last/first pole. Then we lower the front wall and secure the tent according to the manufacturer’s instructions.
Instead of using the skirt, we recently considered extending the walls about 18″ and including straps to keep the bottom of the wall lying on the ground under all circumstances. But Nancy decided it wouldn’t keep the walls as clean as our current method.
The Awning
Occasionally, show rules do not allow it, but we usually put up a front awning. It doesn’t go up while setting up the tent. And it is the first thing to come down after closing on Sunday afternoon. That way, it is out of the way of other artist vehicles coming in to drop off or pick up their supplies. We also take it down Saturday night so that we don’t have to lose sleep over the weather or other artists driving to their tents. The awning zips to the same zipper the front wall would use, but another zipper is on the bottom edge of the awning for attaching the wall.
Daily routine
Our procedure Saturday and Sunday mornings would be to:
- unzip and roll up the front wall
- unzip it from the roof and set it aside
- attach the awning poles
- zip the awning to the roof
- attach it with the bungees to the awning poles
- zip the front wall back up to the awning and leave it in the rolled position (on immediate standby in case of a sudden severe squall)
- Finally, we would reconnect or adjust the Velcro at the top edges of the front walls and the corners of the canopy
Saturday and Sunday evenings, we would reverse this procedure.
In Case Of Rain
During light rain, we would stay open and continue working with customers. I would move the LD or Awning Support Joint on one side up as high as I can get away with. It is normally at the top of the leg as described in Step 3 of the “Trimline Awning Assembly Instructions.” Then I’d lower the joint on the other leg a couple of inches or as much as it takes to stop the water from forming a puddle in the middle of the awning. Then it doesn’t ultimately spill over onto unsuspecting customers. If the rain became too severe, we would drop the front wall and hang out with whatever crowd needed a dry place in the middle of a storm.
In Closing . . .
That’s about everything we’ve learned so far about setting up an art festival tent. How you decorate it is up to you. (There is more than one theory about what works, but that is well beyond the scope of this article and our expertise.) In another article, we explain how to make the panelsannounced shown in our tent in this article’s first image. I hope this helps. If you have a better solution or a solution to a different tent problem that could save our readers some grief, please explain in the comment section below. Thanks!
Leave a Reply