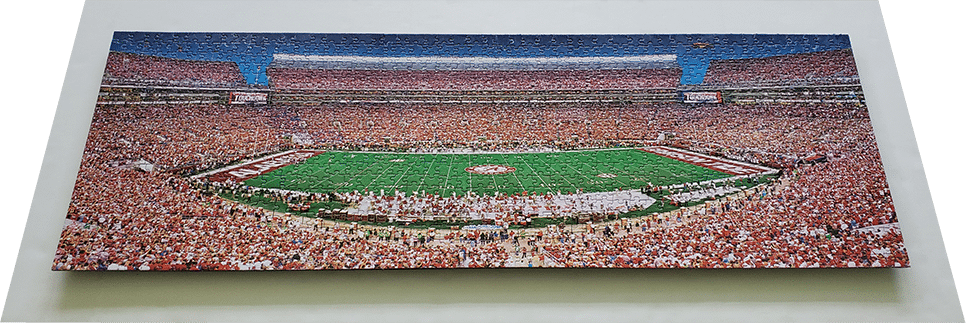
A good friend and neighbor brought us a 1000-piece jigsaw puzzle she had completed (with some help from her family) of Bryant-Denny Football Stadium at the University of Alabama in Tuscaloosa (her alma mater). She had already coated both sides of it with Elmer’s Glue and wanted a simple way to hang it on the wall. Obviously, she had no intension of re-doing this puzzle later. She didn’t want a regular frame and didn’t need it to last forever.
This is what I came up with:


Design
In this design, the puzzle is “glued” to a stiff backing. Then a mounting bracket is attached to the back. Besides allowing the piece to be hung on the wall, the bracket also adds stiffness to the mount.
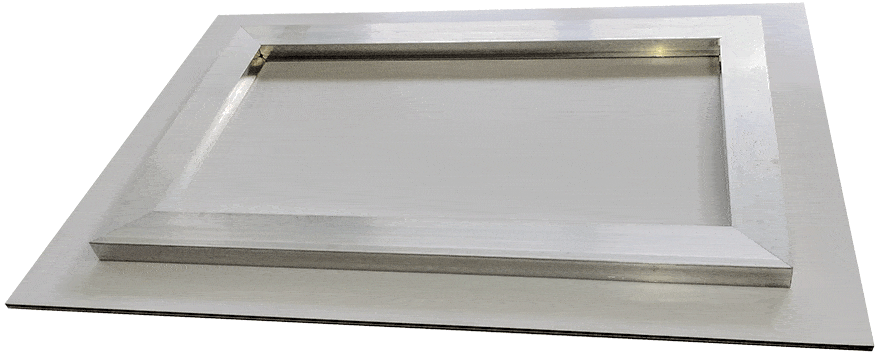
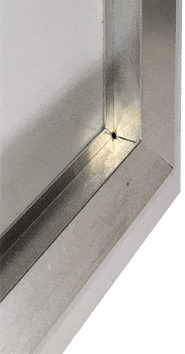
I may have been inspired by the acrylic face-mounted pieces from Best Acrylic Mounting.
Here is example of their work.
|
|
| Figure A: The back of a face-mounted acrylic print from Best Acrylic Mounting | Figure B: A corner of the same mount showing more detail |
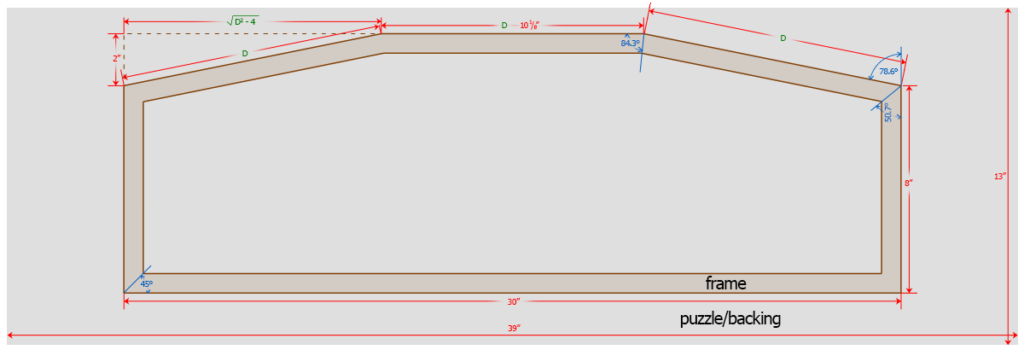
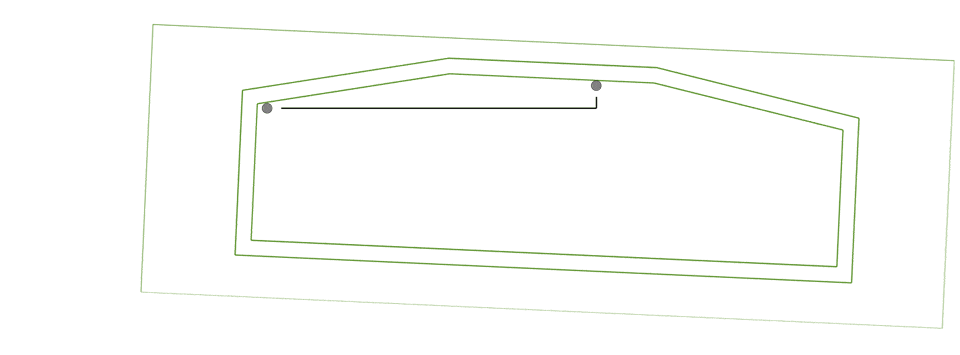
Of course, I had to “improve” it. I thought it would be better if the top edge of the support bracket rectangle had a slight downward arch. Then if the (imaginary) line between the two support nails in the wall wasn’t perfectly horizontal, one could slide the frame just a bit left or right to keep the frame level. Figure 4 shows a diagram of the back of the mount with a hexagonal bracket/frame. In Figure 5, the long black line is horizontal and the nail on the right is noticeably higher. You can see how easy it would be to get the frame level.
Details
In this design, I wanted the top three pieces of moulding to be the same length and I thought a 2″ drop would be about right. There was nothing magical about those figures. That created about an 11-degree drop angle. I show the math in the next Note.
Using the Pythagorean Theorem, as shown in the upper left corner of Figure 4, if you want the three top pieces to each be the same length D, then:
\( \begin{array}{r c l} D+2\sqrt{D^2-4} & = & 30″ \\ 2\sqrt{D^2-4} & = & 30-D \\ \sqrt{D^2-4} & = & 15-\frac{D}{2} \\ D^2-4 & = & (15-\frac{D}{2})^2 \\ & = & 225-15D+\frac{D^2}{4} \\ \frac{3}{4}D^2+15D-229 & = & 0 \end{array} . \)
Then, using the Quadratic Formula,
\( D = \frac{-15 + \sqrt{225+4 \times \frac{3}{4} \times 229}}{1.5} \)
or about 101/8“.
Another Option
It would probably be marginally simpler to make the top bar say 8 or 10 inches and make the drop angle 10 degrees. Just as an exercise, I put those sample calculations in the next note. Use one set of equations or the other, not both.
Letting the top piece of moulding be 10″,
\( \begin{array}{r c l} \cos 10^\circ & = & \frac{ ( \frac{30″-8″}{2} )}{D} \\ D & = & \frac{11}{ \cos 10^\circ } \\ & \simeq & \frac{11}{0.9848} \end{array} \)
or about 113/16“.
Instead of dropping 2″ along the side, as shown in Figure 4, the drop (call it H) will satisfy the equation
\( \begin{array}{r c l} \frac{H}{11} & = & \tan 10^\circ \\ H & = & 11 \tan 10^\circ \\ & \simeq & 11 \times 0.17633 \\ & \simeq & 1.9396 \end{array} \)
or about 115/16“. That means the vertical pieces will be 10” – 115/16” or 81/16“.
Instead of 84.3°, as shown in Figure 4, the corner angles on the top (10″) piece will be (180° – 10°) / 2 or 85°. Remember to set your miter saw to (90 – 85) or 5°.
The top corner angle on the vertical pieces will be (180° – 80°) / 2 or 50° (instead of 50.7°). Set your miter saw to (90 – 50) = 40°.
Keep in mind, the numbers we gave or calculated in both versions were outside measurements, not the usual inside-frame measurements. But since nothing will be going inside this “frame” it probably doesn’t make much difference. Just be consistent.
Construction
Materials and Tools
I happened to have a piece of black 3mm SintraAbout and some 7/8” wide natural moulding (which may have been discontinued by CMI Moulding). In doing my research, I noticed a lot of people use Mod Podge to glue and seal their puzzles in a project like this. Instead, I chose Golden Soft Gel Gloss acrylic mediumTips, partly because it was also implicated in another of my projects (currently still in progress). Soft gel acrylic medium is essentially pigment-less acrylic paint with a little bit of body. It brushes on white but dries clear and can be found in art supply stores. To attach the wood bracket to the Sintra I used Liquid Nails interior construction adhesive.
Your tools should include at least a 2″ wide paintbrush (foam is fine) for the soft gel acrylic medium; a saw or blade to cut and trim Sintra; plywood and weights; frame-making tools – measuring tape/ruler, miter saw, sandpaper, wood glue, clamps, V-nails or equivalent; pencil; caulk gun (for Liquid Nails); and paper towels.
Steps
- Apply your “glue” to the front of the puzzle (this is Step 0 because my customer had already done this). She actually glued both sides. She used Elmer’s glue. Now I think maybe I should have gone ahead and coated the front with the soft gel acrylic medium.
- While that’s drying (or after), prepare your backing board. Cut it maybe an inch larger along each dimension than the puzzle so that you don’t have to be as precise when placing them together. The 3 mm Sintra is the thickest that you can cut with a knife (or mat cutter blade).
- When the front of the puzzle was completely dry, I applied a coat of soft gel medium to the Sintra. Then I coated the back of the puzzle maybe a little more liberally. Don’t be stingy, but don’t be sloppy. Then I placed the puzzle on the Sintra, covered it with a sheet of wax paper (precautionary). I covered with a sturdy piece of plywood, then covered with weight.
- While that’s drying, cut, sand, glue, clamp, and nail the frame/bracket together as you normally would.
- After the gel medium dries, trim the Sintra along the edge of the puzzle.
- Position the bracket on the back of the Sintra and mark/outline with a pencil so you won’t have to fumble with it during the next step.
- With a caulk gun, apply a bead of Liquid Nails to the back of the bracket. Place it in position on the Sintra and press it down. Remove any excess sealant. Add weights and let it dry.
- Admire your work.
Final Word
That’s all there is to it. The customer was thrilled with the simple, but elegant design. If you have any questions or comments, enter them below or contact us by any means found at beehappygraphics.com/blog/contact/. Thank you for your interest.
Leave a Reply